> ## Documentation Index
> Fetch the complete documentation index at: https://docs.eofvpn.cc/llms.txt
> Use this file to discover all available pages before exploring further.
# Configuring EOFVPN on Linux
> Guide for configuring EOFVPN on Linux operating systems
# NekoRay(NekoBox)
* *Installing from a .deb package*
Go to [link](https://github.com/MatsuriDayo/nekoray/releases) and download the package\*.deb of the current version of the program:
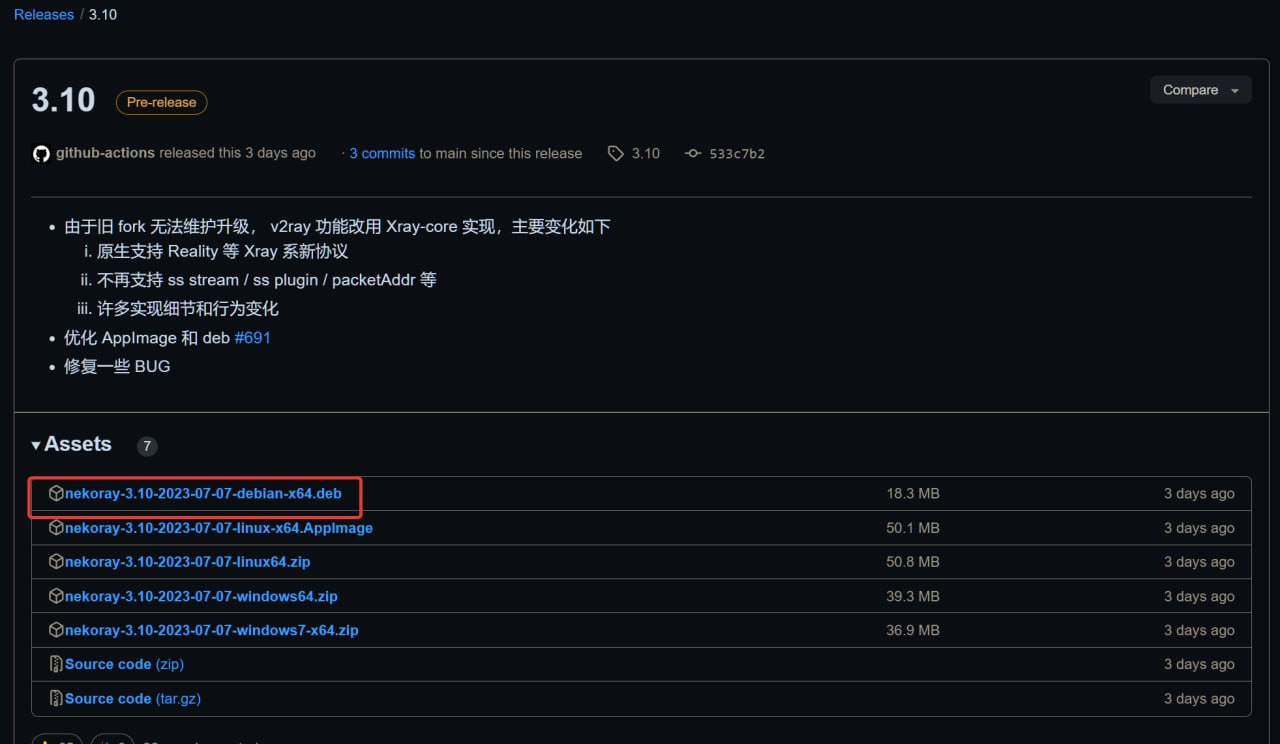 In the folder with the downloaded package, open a terminal and execute the command
`sudo dpkg -i nekoray-3.10-2023-07-07-debian-x64.deb`
> (The name of the package depends on the program version. It is not necessary to rewrite the whole package, just type the beginning and press **Tab**)
For some unknown reason, launching the program from the menu of the current version of **Ubuntu** causes the program to fail. That is why we start the program in the following way: press **Alt+F2,** and in the appeared window write:
`/opt/nekoray/nekoray`
In the folder with the downloaded package, open a terminal and execute the command
`sudo dpkg -i nekoray-3.10-2023-07-07-debian-x64.deb`
> (The name of the package depends on the program version. It is not necessary to rewrite the whole package, just type the beginning and press **Tab**)
For some unknown reason, launching the program from the menu of the current version of **Ubuntu** causes the program to fail. That is why we start the program in the following way: press **Alt+F2,** and in the appeared window write:
`/opt/nekoray/nekoray`
 **Setting up the program**
At first startup, select **sing-vox** support for **sing-vox** when installing **3.10** or higher (since **3.10** - **v2ray** has been replaced by **Xray,** and it currently does not understand **shadowsocket** keys. So you should choose the **sing-woh** kernel. The name of the program will also change, to **NekoBox**). The kernel can be replaced later, if necessary.
To run the program at system startup, in the main program window click **Program** and select **Start with system:**
**Setting up the program**
At first startup, select **sing-vox** support for **sing-vox** when installing **3.10** or higher (since **3.10** - **v2ray** has been replaced by **Xray,** and it currently does not understand **shadowsocket** keys. So you should choose the **sing-woh** kernel. The name of the program will also change, to **NekoBox**). The kernel can be replaced later, if necessary.
To run the program at system startup, in the main program window click **Program** and select **Start with system:**
 Get the key in [configurations](https://sub.eofvpn.cc/) and copy it to the clipboard.
Click **Servers** select **Add profile from clipboard:**
Get the key in [configurations](https://sub.eofvpn.cc/) and copy it to the clipboard.
Click **Servers** select **Add profile from clipboard:**
 In the main program window through **Program** - **Groups** you can create groups for more convenient sorting of keys, if there are many of them. To move a key between groups - right click on it, select **move**.
 Start the server by selecting it in the list and pressing **Enter** (or by right-clicking and selecting **Start**).
**Proxy server settings in the program:**
Start the server by selecting it in the list and pressing **Enter** (or by right-clicking and selecting **Start**).
**Proxy server settings in the program:**
 At the top of the main window, enable **System Proxy** (to disable the system proxy, uncheck the box).
 Checking your location change to [**https://ipinfo.io/**](https://ipinfo.io/)
**You should check it in incognito mode, as browser add-ons to bypass blocking will interfere with the work of the system proxy.**
**Important:** closed program window does not shut down the program! The program can only be shut down or restarted via the tray icon and the pop-up menu.
Checking your location change to [**https://ipinfo.io/**](https://ipinfo.io/)
**You should check it in incognito mode, as browser add-ons to bypass blocking will interfere with the work of the system proxy.**
**Important:** closed program window does not shut down the program! The program can only be shut down or restarted via the tray icon and the pop-up menu.
 The program is able to export [keys](https://sub.eofvpn.cc/) to buffer, to file and to QR code, which is convenient for transferring settings to another program or to another device (phone).And vice versa - if you have a webcam on your computer and a program that can scan QR codes, it is convenient to copy the key from the phone through export on the phone to QR code, then scan it on the computer - and the key is in the buffer. Add it in the same way as copied from the string - **Add profile from clipboard**.
### Problems observed
@Kotofey456 warns:
Debian11 system, program `nekoray-3.26-2023-12-09-debian-x64.deb`.
Clicked this button in the settings, changed the icon to my.png file:
The program is able to export [keys](https://sub.eofvpn.cc/) to buffer, to file and to QR code, which is convenient for transferring settings to another program or to another device (phone).And vice versa - if you have a webcam on your computer and a program that can scan QR codes, it is convenient to copy the key from the phone through export on the phone to QR code, then scan it on the computer - and the key is in the buffer. Add it in the same way as copied from the string - **Add profile from clipboard**.
### Problems observed
@Kotofey456 warns:
Debian11 system, program `nekoray-3.26-2023-12-09-debian-x64.deb`.
Clicked this button in the settings, changed the icon to my.png file:
 The program crashed and wouldn't start even after reinstalling, rebooting, etc. I fixed it only by deleting the folder with program settings at /home/username/.config/nekoray/config.
### Operation of the program in VPN (TUN) mode:
To work in **VPN** mode, go to **Preferenses - Routing settings** in the main program window. Open the **DNS** tab. In the **Direct DNS** line copy the value from the **Remote DNS:** line above.
The program crashed and wouldn't start even after reinstalling, rebooting, etc. I fixed it only by deleting the folder with program settings at /home/username/.config/nekoray/config.
### Operation of the program in VPN (TUN) mode:
To work in **VPN** mode, go to **Preferenses - Routing settings** in the main program window. Open the **DNS** tab. In the **Direct DNS** line copy the value from the **Remote DNS:** line above.
 (by default the **Direct DNS** string is **localhost**. This default setting worked in previous versions of the program).
In the main program window enable **VPN Mode** and **System Proxy** (enabling System Proxy additionally eliminates DNS leak) In recent versions of the program the name **VPN** has been replaced by **TUN**:
(by default the **Direct DNS** string is **localhost**. This default setting worked in previous versions of the program).
In the main program window enable **VPN Mode** and **System Proxy** (enabling System Proxy additionally eliminates DNS leak) In recent versions of the program the name **VPN** has been replaced by **TUN**:
 Start the server as above and check your location change to [**https://ipinfo.io/**](https://ipinfo.io/)
**⚠️\*\*The instructions are supplemented by⚠️**
The material was prepared with the support of [highloadvpn](https://highloadvpn.t.me/)
This documentation is built and hosted on [Mintlify](https://mintlify.com), a developer documentation platform.
Start the server as above and check your location change to [**https://ipinfo.io/**](https://ipinfo.io/)
**⚠️\*\*The instructions are supplemented by⚠️**
The material was prepared with the support of [highloadvpn](https://highloadvpn.t.me/)
This documentation is built and hosted on [Mintlify](https://mintlify.com), a developer documentation platform.